Many people enjoy kayaking for a variety of reasons. I’ve been on kayaks that have been well used, scraped, and scarred. This article will explain how to repair a rotomolded polyethylene kayak.

Rotomolding is a process where plastic is heated until it is liquid and then it is injected into a mold under pressure. The heat will cool the plastic and it will form the shape of the mold. Rotomolding kayaks are popular because they are lightweight, durable, and can be repaired with ease. When the kayak needs to be repaired, a piece of fiberglass can be used to fill in the area that needs repair. The fiberglass is then sanded to create a smooth surface. The surface is then painted with a high-quality paint to protect the kayak.
Cleaning rotomolded plastic kayaks
The easiest way to clean a rotomolded kayak is to use a garden hose with a spray nozzle to spray off the kayak. If the kayak is dirty or has a lot of algae on it, you can use a mild detergent and a soft brush to scrub it off. Be sure to rinse the kayak off thoroughly after cleaning.
Welding repair on a rotomolded polyethylene kayak
There is no one-size-fits-all answer to this question, as the ability to plastic weld a kayak depends on the specific type of kayak and the type of welding that is being attempted. However, in general, plastic welding is a viable option for repairing small cracks and holes in kayaks, and it can also be used to reinforce weak spots in the kayak’s construction.
Repairing cosmetic rotomolded polyethylene kayak damage
Cosmetic damage is defined as something that mars the kayak’s appearance but not its function. On
polyethylene boats cosmetic damage usually takes the form of scrapes, superficial slits, cuts or gouges, and
dents in the hull panels.
Repairing rotomolded polyethylene kayak abrasions and scrapes
Abrasion occurs due to wear and tear, typically in localized areas. Common locations for abrasion are the stems or ends of boats and under the seat in kayaks. Polyethylene is known for its durability, which is largely due to its elasticity and ability to flex and absorb impact and contact. However, the flexibility of polyethylene is limited under the seat due to the seat structure and the concentration of the paddler’s weight.
Abrasion often takes the form of a series of scrapes and shallow gouges, which typically do not require attention unless they continue to accumulate over time, leading to deeper gouges. At this point, the damage transitions from cosmetic to structural, as there is a difference in flexibility between the abraded section and the neighboring hull sections. To test for this, you can press on the hull with your palms and compare the resistance.
If you want to improve the appearance of your hull, you can use a sharp knife (such as an x-Acto® knife) to cut away any raised edges along the sides of the abrasion. A file or Surform® rasp can also be used effectively to smooth out the hull surface. Unfortunately, painting the hull is not an option, as paint will not adhere to polyethylene.
Gouges
Gouges can be a challenging issue to address. While it may initially seem simple to fill and smooth out a gouge, the difficulty arises from the fact that polyethylene does not provide a favorable bonding surface for new materials. Additionally, the flexibility of the material creates a further obstacle to achieving a strong bond between the original material and any filler or new material.
In most cases, it is advisable to simply smooth the edges of the gouges, similar to what you would do with slits and cuts, and accept them as they are. However, if you do wish to attempt to fill the gouge, you can refer to the instructions for filling cracks in the section on structural repair.
Cuts and slits
When compared to rough river rocks, ledges, and even coarse-grained sand, polyethylene is a relatively soft material, which means that it will not fare well in a collision. As a result, it may experience abrasion, as well as superficial cuts or slits in the hull, which can be identified by the raised edges on either side of the cut.
However, these cuts do not typically pose a structural concern. To minimize the visual impact of these cuts, you can use a sharp knife, file, or rasp to remove the raised material. Alternatively, a rotary tool like a Dremel® or Black & Decker Wizard® can be effective in removing the feathered edges.
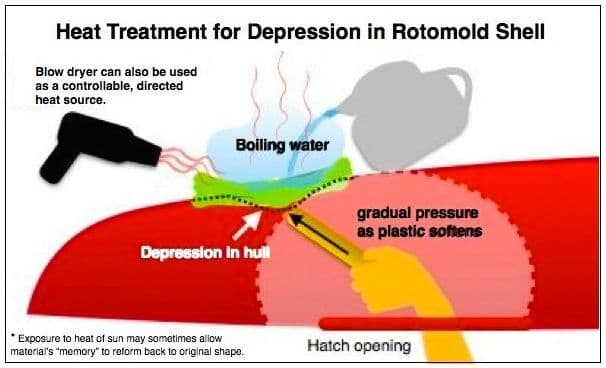
Dents
Dents in the hull can occur due to various reasons, such as impacts from paddling or a weight left resting on the boat, long-term storage in one position, or exposure to prolonged sunlight. Tying your boat down tightly on your roof racks, especially on sunny hot days, can also lead to dents and deformations. To prevent such damage, it is advisable to periodically ease your tie-down ropes or straps and store your boat suspended in web straps or resting on rigid sections of the hull.
Understanding the source of the dents can help prevent future damage, but it doesn’t solve the issue of existing dents. However, heat can be used to encourage the polyethylene’s memory to recall its original shape. For minor dents, leaving the boat exposed to bright sunlight and applying gentle pressure on the inside of the hull may be sufficient. If the dent proves to be stubborn, a hair dryer can be used to increase the heat.
However, a heat gun should be used with caution, with the gun kept at least 1″ from the hull and in constant motion. It is essential to watch carefully for any signs of glistening or melting of the hull surface and to apply pressure from the inside of the hull while applying heat to the exterior. Gloves should be worn to protect the hands while heating the hull.
Another option is to rig a brace that applies consistent pressure to the inside of the hull while the boat is exposed to sunlight or heat.
Structural kayak repairs
Structural repairs involve damage to the hull or the fittings connected to it, such as hatch rims. While caulk or sealants are commonly used for repairing, polyethylene is not easily bonded to any sealant for long-term repairs. The best sealant for polyethylene is Lexel®, which is used by manufacturers to seal the junction between minicell bulkheads and the hull’s interior.
However, even the best sealant is not effective in adhering to polyethylene alone. To make the junction between fittings and the hull drier, a caulk or sealant is used as the filling between the fittings, compressed by mechanical fasteners such as rivets or bolts.
Determining whether a boat is made of crosslink or linear polyethylene is crucial in evaluating the possibilities for repair. Crosslink is stronger and stiffer than linear poly, but it has significant disadvantages, including the fact that it is not repairable and not recyclable. On the other hand, linear polyethylenes are repairable, recyclable, and less hazardous to work with.
The first step in assessing the possibilities of repair is to determine if your boat is linear or crosslink polyethylene. Whitewater kayaks are more likely to be built of crosslink than touring or recreational boats. The best way to determine whether your boat is built of linear or rotomolded polyethylene is to contact the manufacturer with the boat’s serial number and ask them to check their production records.
How to repair rotomolded polyethylene kayak cracks
Cracks are the most common structural damage that “poly” boats suffer. In many cases, these are repairable, but the process is challenging. To attempt a repair of this type of damage, the following tools and materials are required: hot air gun with reducing nozzle or propane torch, wire cutters, drill (can be done without), drill bits (1/8″ – 1/4″ – 1/2″), file or rasp, sharp knife, fine-edged metal putty knives (2), vise grips (pliers can work), coarse grit sandpaper, polyethylene welding rod (can be obtained from most manufacturers; it’s best to use the rod provided by the manufacturer of the kayak to be repaired), and denatured alcohol.
The first step is to clean the area around the crack thoroughly and make sure it’s dry. Then, heat the area carefully with a heat gun or torch to dry it out. The next step is to drill a hole at either end of the crack with a 1/8″ drill bit, or if a drill isn’t available, heat the end of a drill bit with a torch, holding it with vise grips, and melt a hole at each end of the crack to prevent it from “walking” or extending after the repair.
If a hot air gun is available, insert a putty knife into the crack to create a slight gap, and position knives at least 1″ from the hole at one end of the crack. Preheat the first 1/4″ of the poly weld rod until it gets limp and clear as poly liquefies. Then, starting 1/4″ beyond one end-hole, apply the hot end of the weld rod to the hull.
Holding the weld rod at an angle away from the crack, begin to push the rod onto the crack, making sure the melted poly fills the end-hole, enters the gap created by the putty knife/knives, and that the hot air gun is held approximately 1-2″ away from the hull at a complementary angle to the welding rod to heat rod and crack as you proceed.
To repair a crack in a polyethylene hull, start by using a putty knife to apply melted weld rod along the crack, making sure to leave a slight gap to allow the melted plastic to fuse with the hull. Keep the weld rod hot and liquid as you work along the crack, removing the putty knife spacers to let the crack close. Overfill the end-holes at the beginning and end of the crack, then smooth out the excess poly with gloved hands and heat it with a hot air gun if needed. Allow the hull to cool completely before testing the quality of the bond by prying up the bead of poly with a putty knife. If the bead lifts easily or separates from the crack, the repair is not good enough.
Alternatively, you can use a propane torch to generate heat, but do not melt the weld rod directly with the flame. Instead, drill end-holes and slightly open the crack with putty knives, then heat a drill bit in a vise grip until it glows red hot and use it to melt the plastic along the crack. Roll the bit or work in a circular motion to cover the crack with melted plastic, while holding the poly weld rod against the hot bit to melt it and drip it onto the hull. Keep both the rod and the hull hot, periodically reheating the bit as needed. Overfill the end-holes, then smooth out the excess poly with gloved hands and pass the torch over the repair several times without letting the flame touch the hull. Finally, let the hull cool completely before testing the quality of the bond as described above. Be careful not to damage the hull with excess heat or flame exposure.
How to Fix a Rotomolded Plastic Kayak with a Hole In It
If you have a hole in your roto-molded kayak, you can fix it with a few simple steps.
1. Clean the area around the hole with a degreaser or soap and water.
2. Apply a layer of epoxy to the area around the hole.
3. Apply a layer of fiberglass cloth to the epoxy.
4. Apply a layer of epoxy over the fiberglass cloth.
5. Allow the epoxy to dry.
When dealing with small holes in your hull, the repair process is similar to filling end-holes on cracks. However, you may need to slightly enlarge the hole first to allow melted poly to seal it. This can be done by drilling with a small bit or heating the drill bit and melting the hole slightly. For optimal results, heat the area around the hole and apply the melted poly from the weld rod to the surface while the hull is still hot. This allows the repair poly to bond with the hull material as the repair cures.
To repair the hole, press the melted end of the poly rod against the hole and rotate the rod in the hole to spread adequate repair material in place. Cut off the unmelted part of the poly rod, but avoid pulling the rod away as this could pull the melted poly from the hole.
For larger holes, it is possible to weld a patch to your hull, but this can be a more complicated process.
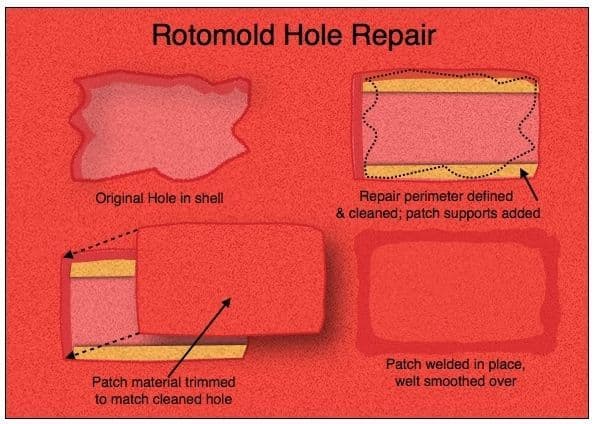
How to repair rotomolded polyethylene kayak holes
Repairing large holes can be a challenging process as it involves melting the existing hull surface at the point of repair, which may cause further damage to the hull. Therefore, it is recommended to practice the repair process on scrap pieces of polyethylene before attempting it on the boat. If possible, obtain a patch of suitable size from the boat’s manufacturer for the best results.
To begin the repair, cut the patch slightly larger than the hole, and ensure that it has a rounded shape to prevent sharp edges or corners. It can be cut using large wire cutters, a jigsaw, or a circular saw. Heat the patch until it becomes slightly pliable and then hold it in place over the area to be patched until it cools and matches the contour of the hull section.
Prepare the hull surface to be covered with the patch by sanding it to raise a texture and small feathers of material. Wipe it clean with denatured alcohol and let it dry. Then, take the weld rod and melt a circle of polyethylene around the hole in the hull.
Heat the area to be patched until the hull surface softens slightly, and alternate heating the underside of the patch to ensure that both attain the same temperature. Make sure that the bead surrounding the hole is soft and melted. While all surfaces are hot, press the patch onto the hull and hold it in place.
Take the weld rod and melt a bead along the exterior edge of the patch, melding the patch and hull into one piece. Use a gloved finger or flat-tipped screwdriver to shape the polyethylene bead from the weld rod so that it smoothes the transition from the original hull to the patch, eliminating any sharp edges.
Allow the patched area to cool completely before moving or disturbing it. If melting a patch seems challenging or risky, an alternative approach could be considered.
How long do rotomolded kayaks last?
There is no definitive answer to this question as kayaks made from rotomolded plastic can vary in terms of quality and durability. However, in general, rotomolded kayaks should last for several years with proper care and maintenance.
Oil canning kayak hulls
Oil canning is a common issue with rotomolded kayaks, and is caused by the plastic flexing in a specific pattern. This can be caused by things like a heavy load in the kayak, or by the kayak being in a temperature differential (hot and cold).
The good news is that oil canning is usually a cosmetic issue only, and doesn’t affect the structural integrity of the kayak. However, if it is left unchecked it can lead to bigger problems down the road.
If your kayak has some small dents or oil canning, you can try to fix it yourself. Here are a few tips:
– Use a hair dryer or other heat source to heat up the plastic and make it more flexible
– take a blunt object like a screwdriver or a hammer to try to push the dent out from the inside
– Use a vacuum cleaner to suck the dent out from the inside
If the dent is too big or if it is in a difficult-to-reach place, it is best to take the kayak to a professional for repair.
Prevention
The best way to prevent having to do rotomolded kayak repair is to keep it clean and free of debris. Make sure to avoid sharp objects and never drag the kayak across rough surfaces. It is also a good idea to store the kayak in a covered area when not in use.